Setup Instructions for HDSDR Software (for RX)
Version
These instructions are based upon the following software versions
- HDSDR Version 2.70
- CFGSDR Version 2.6
- extIO.dll file dated 5/9/2012 (part of CFGR download and install)
Assumptions
These instructions are predicated upon the following assumptions
- Operating system is Windows Vista, or 7 (XP and 8 were not tested, but will probably work
- RX Rig has an Si570-based Local Oscillator
- You have wired the I and Q outputs of your rig as per the build instructions
Setup Steps
Install HDSDR software on your Computer
- Download HDSDR from http://www.hdsdr.de/
- Run the downloaded Install program and go with the default options
- Make note of the location into which HDSDR will be installed (should be in "c:/Program Files(x86)/HDSDR" or similar)
Install CFGSDR on your Computer
- Download CFGSDR from http://pe0fko.nl/CFGSR/#download
- Run the downloaded install program and go with the default options
- Make note of the location into which CFGSDR will be installed (should be in "c:/Program Files(x86)/CFGSDR" or similar)
- Go into the previously noted CFGR folder and copy the file named extIO.dll
- Paste the copied file into the previously noted HDSDR folder. This will tell HDSDR that your rig is an Si570-based rig.
Configure HDSDR for your Setup
-
 Start HDSDR (there should be
an icon on your desktop)
Start HDSDR (there should be
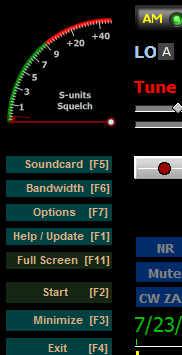
an icon on your desktop) - The following steps are done from the HDSDR Control Panel (lower left of screen)
- Click on "SoundCard (F5) or press the F5 key
- Select your RX soundcard (Input for I and Q, and Output for Speaker) and then click on the "OK" button at the bottom of the selection dialog box.
- Click on "Bandwidth (F6) or press the F6 key
- In the dialog for bandwidth, select 48000 for the "Input" bandwidth (unless you are certain your soundcard can deliver a higher sampling rate); accept the default for the "Output". This will give you a tuning range of +/- 48 kHz around the Local Oscillator ("Center") frequency. "X" out of the dialog once you have made your selection.
- Click on "Options (F7) or press the F7 key
- In the dialog presented, click on "Select Input" and make sure the "Softrock Si570 is chosen. Note: if you do not see a choice for "SoftRock Si570", you may not have properly copied the "extIO.dll" file into the HDSDR program's folder.
- Select the "Swap I and Q Channels for RX Input" option. Note: if later you notice that, upon receiving SSB signals, the USB and LSB seem to be switched, you can use this option to switch them back.
Operating the Radio
Set up your Rig
- Load HDSDR but do not "Start" it yet.
- Connect the "Line In" jack on the RX to the "Line In" input jack of your PC's (or external USB) soundcard.
- Verify that your soundcard's "Line In" is enabled. You can do this from the HDSDR Control Panel's Options (F7) Menu, under the "Select Input" option by clicking on "Open Input Mixer". This will take you to the "Recording" Tab of your PC's Sound Management Mixer (Windows 7="Sound"; Win XP="Recording Control") where you can find and/or enable the line in on your input soundcard.
- Connect a 50 ohm antenna to your Rig's antenna connector
- Connect your Rig's USB connector to one of your rig's USB ports
- Apply power to your rig
Operating Instructions
Starting/Stopping
In the HDSDR Control panel there is a "Start (F2)" button you click (or press the F2 key) to start up the SDR software. Once you click on the "Start (F2) " button, it becomes a "Stop (F2)" button.
Tuning
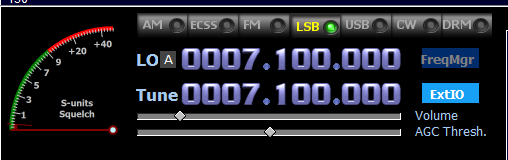
You will spend a lot of time in the Frequency portion of the Control Panel. There are three important controls here:
- LO - Local Oscillator (or "Center Frequency"). This controls the Si570 oscillator's output.
- Tune. This allows you to tune to frequencies above and below the LO frequency, limited in width by the bandwidth available on your soundcard. In most cases, this means you can tune +/- 24 kHz of the LO frequency.
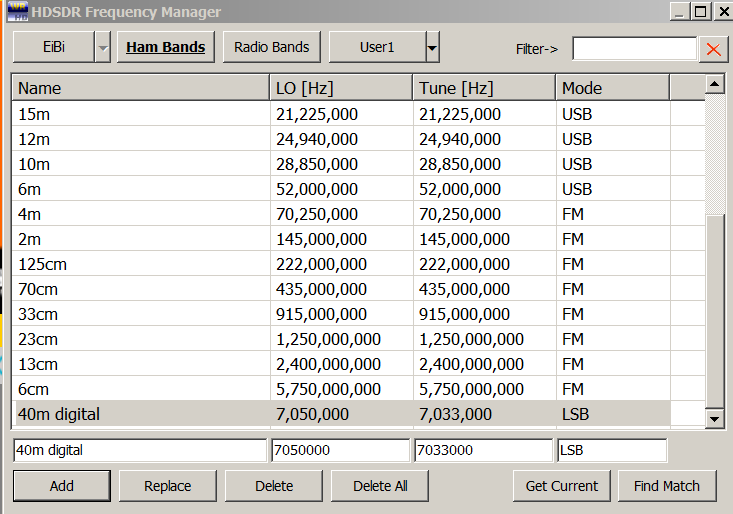
- FreqMgr. This brings up a handy frequency management dialog that lets you establish favorite "Center Frequencies" in a frequency memory. Double clicking on any of these will cause the LO and Tune entries to immediately be set at the selected frequencies. You can add, edit, or remove lines in the FreqMgr.
- "A" (or "B") Frequency Memories: The LO/Tune settings have two memory registers, "A" and "B", between which you can switch using the button just following the letters "LO". You can also use Control+V to switch registers. Switching registers changes the values in LO and Tune.
- Setting LO and.or Tune Frequencies: You can set this value using your mouse wheel to change any one of the digits. Just place the cursor under the appropriate digit and wheel up the desired value. An easier way is to place the cursor in the LO (or Tune) frequency and begin to type a frequency. This will bring up a dialog that accepts your typed in frequency and allows you to assign it to LO, or Tune, or "QuickTune" (both LO and TUNE). If you press the enter key, the number you type in is assumed to me in MHz; if, instead, you click on one of the other frequency unit keys (e.g., Hz, kHz, GHz), the resulting frequency willuse that unit of measure.
- Operating Within a Band. Here is where you will likely use the mouse-wheel method of changing frequencies. By placing the cursor on the 10 kHz digit and wheeling the mouse, you can "scan" the band in 10kHz chunks and still maintain visibility while scanning. Using the 100kHz, you can make gross-level changes in frequency within the band but, depending upon your soundcard's bandwidth, you may "jump" over signals that you would catch by using smaller increments in frequency.
- Yet another approach to tuning is the "slide-rule" approach. With your mouse, place the cursor in the horizontal ruler (graduated in kHz units) at mid screen. When the cursor is properly placed, you will see the cursor change to the Windows "move" icon. You can then "grab" the band "ruler" with your left mouse click and drag it left or right. As you do so you will note that the LO and Tune frequencies change to keep alignment with the "ruler".

Keyboard Shortcuts
If you are more a keyboarder than a mouser, you may want to review the following table of keyboard shortcuts, which was provided in the HDSDR download:
HDSDR Keyboard Shortcuts
| Function | Keyboard Shortcut |
| Set LO frequency on tuned frequency (to be considered LO<->Tune Offset) | C |
| Enter new LO frequency | Ctrl+O or L |
| Enter new Tune frequency | Ctrl+T or T |
| Enter new Quick Tune frequency (auto LO) | Ctrl+Q or Q |
| Fast frequency input | 1 - 9 |
| Switch between LO A and B | Ctrl+V |
| Frequency Manager + Bands | Ctrl+B |
| Increase LO frequency by visible spectrum bandwidth | Ctrl+PageUp |
| Decrease LO frequency by visible spectrum bandwidth | Ctrl+PageDown |
| Select MouseWheelStep | Ctrl+Home or Menu |
| Increase Tune frequency by MouseWheelStep | Ctrl+Up |
| Decrease Tune frequency by MouseWheelStep | Ctrl+Down |
| Increase LO frequency by MouseWheelStep | Ctrl+Right |
| Decrease LO frequency by MouseWheelStep | Ctrl+Left |
| Enter new Locut frequency | Shift+L |
| Enter new Hicut frequency | Shift+H |
| Increase Locut frequency | Shift+Up |
| Decrease Locut frequency | Shift+Down |
| Increase Hicut frequency | Shift+Right |
| Decrease Hicut frequency | Shift+Left |
| Switch Mode to AM | Ctrl+A |
| Switch Mode to CW | Ctrl+C |
| Switch Mode to DRM | Ctrl+D |
| Switch Mode to ECSS | Ctrl+E |
| Switch Mode to FM | Ctrl+F |
| Switch Mode to LSB | Ctrl+L |
| Switch Mode to USB | Ctrl+U |
| NB – Noise Blanker RF | B |
| NB – Noise Blanker IF | I |
| NR – Noise Reduction | R |
| Manual Notch Filter (Beat Cancel) | N |
| Automatic Notch Filter (Auto Beat Cancel) | A |
| AGC (fast/mid/slow/off) | G |
| Mute on/off | M |
| Volume | +/- |
| Swap position of Waterfall/Spectrum | S |
| Swap position of RF/AF Display | Ctrl+S |
| Save current RF Waterfall to image file (in WAV recording directory) | Ctrl+W |
| Collapse Mode (only upper Display) | Shift+C |
| Compact Mode (without RF+AF Display) | Shift+X |
| Zoom RF Spectrum | Ctrl+'+' |
| UnZoom RF Spectrum | Ctrl+'-' |
| Reset RF Spectrum Zoom to full bandwidth | Ctrl+0 |
| Increase RF FFT Resolution Bandwidth (RBW) | Ctrl+'*' |
| Decrease RF FFT Resolution Bandwidth (RBW) | Ctrl+'/' |
| Zoom AF Spectrum | Shift+'+' |
| UnZoom AF Spectrum | Shift+'-' |
| Reset AF Spectrum Zoom to full bandwidth | Shift+0 |
| Increase AF FFT Resolution Bandwidth (RBW) | Shift+'*' |
| Decrease AF FFT Resolution Bandwidth (RBW) | Shift+'/' |
| S-meter calibration: Increase level | Shift+Up |
| S-meter calibration: Decrease level | Shift+Down |
| S-meter calibration: Reset level | Shift+Home |
| AFC | F |
| Set AFC carrier search range for AM/ECSS modes | Shift+A |
| CW ZAP | Z |
| CW Peak | P |
| CW Despreading | D |
| Switch between RX and TX | Space |
| TX mode: Switch CW carrier tone on/off | Return |
| Rewind WAV file | Shift+W or Shift+Home |
| Jump to next WAV file (Multipart WAV file only) | Shift+End |
| Switch WAV file looping | Shift+O |
| Record WAV file | Shift+R |
| Play WAV file | Shift+P |
| Stop Playback/Recording | Shift+S |
| Pause Playback/Recording | Shift+B or Space |
| Change WAV step size | Shift+K |
| Increase WAV file position by 'step size' | Shift+PageUp |
| Decrease WAV file position by 'step size' | Shift+PageDown |
| Show GUI of ExtIO-DLL | H |
| Help / Info / Update check | F1 |
| Start/Stop HDSDR | F2 |
| Minimize HDSDR | F3 |
| Exit HDSDR | F4 |
| Open sound card selection dialog | F5 |
| Open sampling rate dialog | F6 |
| Open Options menu | F7 |
| Full Screen | F11 |
| Boss Key | Pause |